
In our April 2026 Tourism Tech Session, Tourism Tribe Operations Manager Julia Retson walked operators through video editing in Canva – covering talking head clips, timeline editing, subtitles, animated elements, and how to use Google Vids as an alternative. Participants also learned when to switch to native social media apps for the final touches that give content an algorithm boost.
In this article: Starting in Canva | Editing your clips | Building the video | How Google Vids compares | Final touches and the algorithm | Things to try this week
Watch the Recording
If you’re a Tourism Tribe member, login here to watch the recording of this session.
What are Tourism Tech Sessions?
Our Tourism Tech Sessions are twice monthly group coaching calls designed to support AI Enablement Plan members, whether you’re a direct member or a participant of one of our tourism digital capability programs. These sessions provide a space to:
- Learn the latest developments in tourism tech
- Ask questions in a safe, supportive environment
- Hear real-life examples and get practical demos
- Get the confidence to implement what you’ve learned
If you’re not a member, this article will walk you through the key takeaways. Join an AI Enablement Plan to access future Tourism Tech Sessions and have an expert at your fingertips to ask your business-specific questions.
Starting Your Video in Canva
Canva runs on a freemium model. Many editing tools are available for free, while paid features have a small crown icon on top of them. The paid features these days are pretty helpful but not absoluately required to get started.
To start a new video file, go to Create, select mobile video, and start from a blank template. Once uploaded, you can import your video by dragging it into your file. If your video is not the same size as the reel you are creating, you can always resize it by dragging the corners – just be on the lookout for graininess if you’re making it bigger than it’s original resolution.
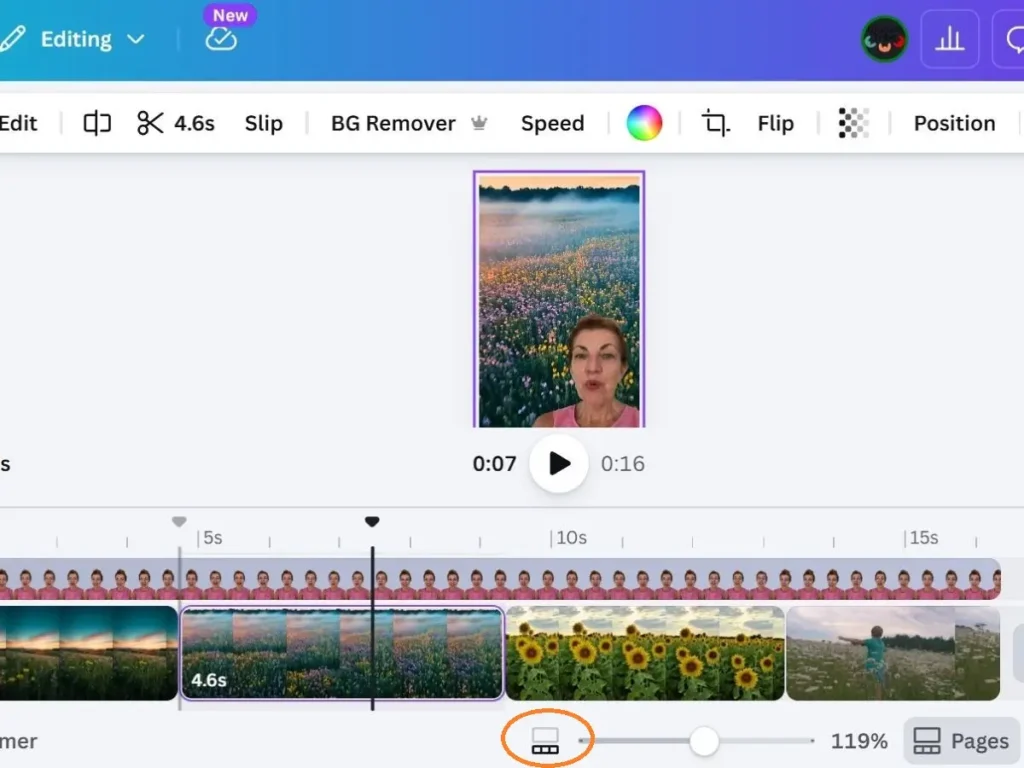
Canva has two separate zoom controls at the bottom right. The lower section (the three rectangles) zooms the timeline, which is useful for precise trimming. The upper section (the single square) zooms the video preview.
One quirk we’ve noticed in Canva as compared to some other video editing tools: if you reorder your scenes, text and elements don’t automatically shift with them. That’s ok, but it’s best then to build your structure first, then add text overlays and graphics once you’re sure of the order that your clips will go in.
Editing Your Clips
You can use non-destructive editing in Canva – when you trim a clip by dragging the white line at either end of it on the timeline, you’re hiding the part you don’t want while the original video file stays intact. This allows you to later extend it again at any time if needed. It gives you a bit more flexibility trimming your video clips this way instead of actually splitting the file in two.
Still photos work exactly the same as video clips – drag them into the frame and set the duration by stretching the clip on the timeline.
The paid Highlights tool is a very useful feature to quickly pull out the best sections of your video. Upload a longer clip, click Edit, and select Highlights. Canva analyses what was said and pulls out the strongest sections automatically. Each highlight becomes a separate clip you can reorder or delete.
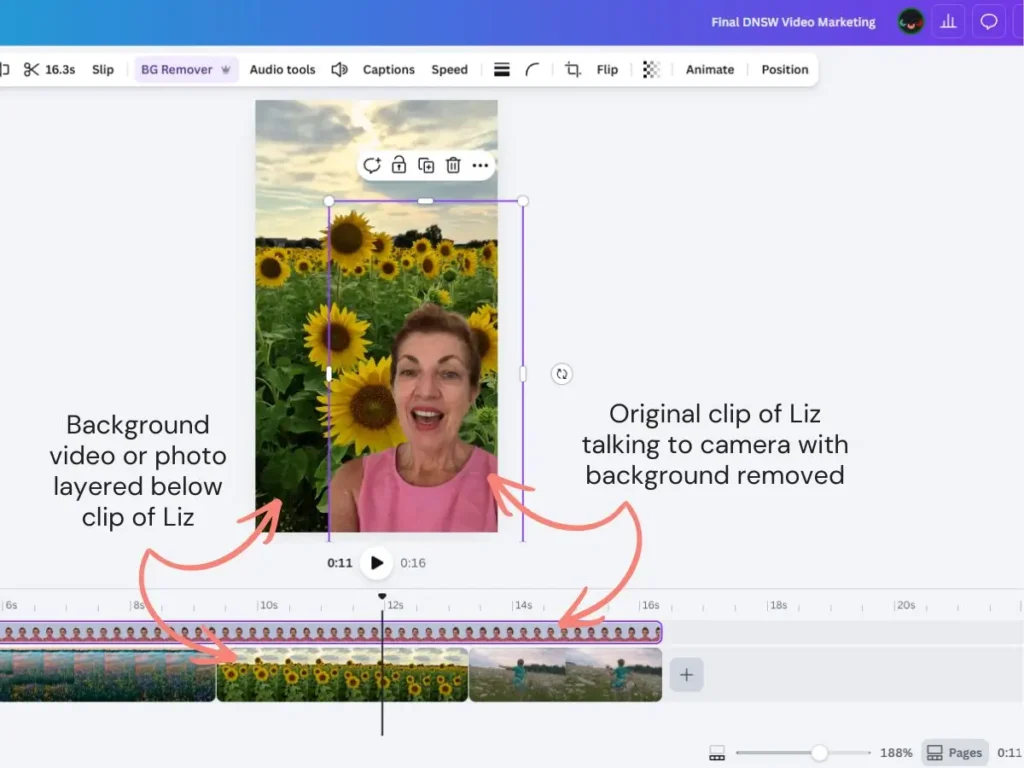
The paid background remover tool is also useful to create talking head clips. Record yourself speaking to camera and use this tool to remove the background. You can then overlay this clip over a background of your choice.
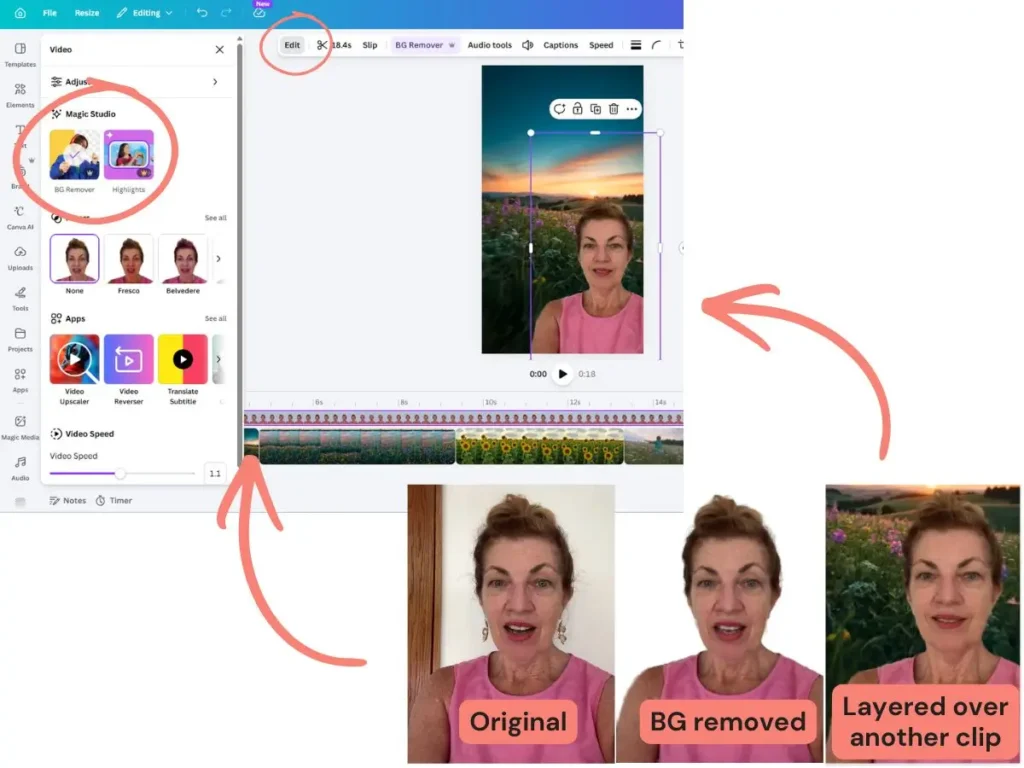
To layer a background, search for a video or image in Canva’s elements and drag it below your talking head clip on the timeline stack. Pick backgrounds that look slightly imperfect. Too polished and the video reads as AI-generated.
Building the Finished Video
To add a transition between background clips, hover between them on the timeline and click Add a transition. The Flow effect works well. Be careful if both clips have people speaking – the audio can overlap when the transition plays.
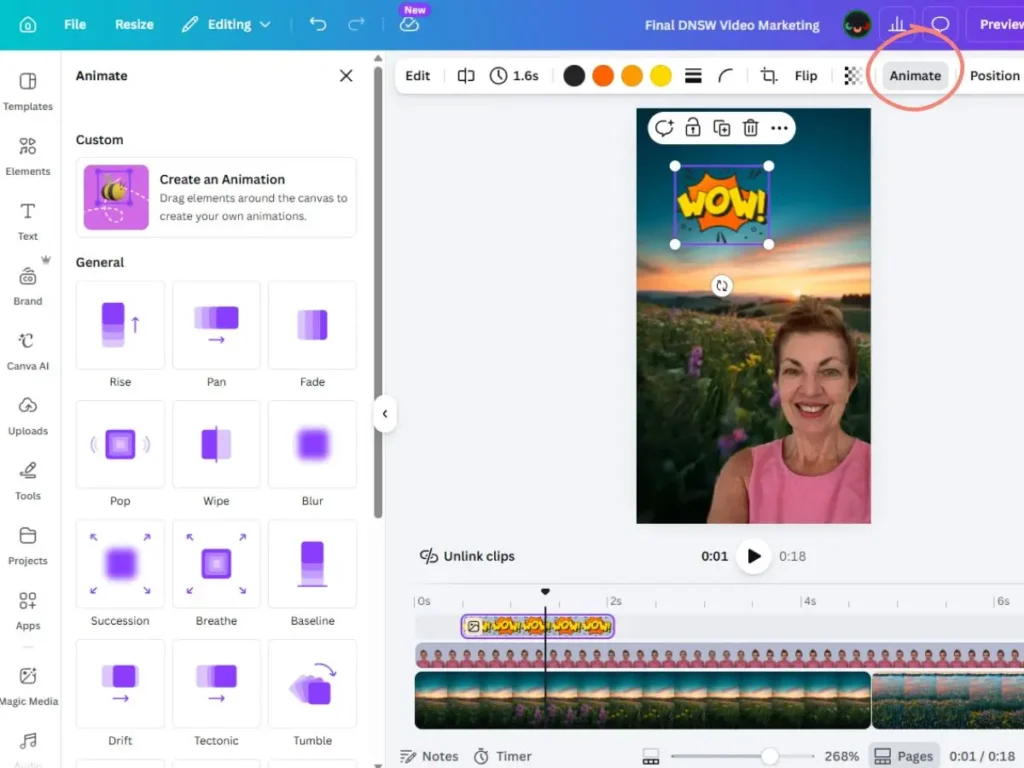
Animated graphic elements can also be used to add movement without overly complicated editing. Add a graphic, shorten its duration on the timeline, then click Animate to set an entrance or exit effect. You can also search elements for graphics that are already animated and loop automatically.
If you want to only use the audio from a clip, you can right-click with that clip selected and choose Extract audio, which will separate the audio from the video. The audio track will stay on the timeline even after you delete the video element.
Add subtitles by selecting your clip, going to Text, and choosing Captions. Click Generate captions and let Canva transcribe the audio. Click any line of caption text to correct mistakes. If you have a strong Australian accent, check the transcript carefully as we’ve found Canva, Instagram and especially TikTok auto-captions often have mistakes. We once had auto-captions add a swear word to our auto-captions in a video speaking about bucking a person off a horse – not a good look for a family friendly business if we had not checked and corrected the error.
How Google Vids and Other Video Editing Options Compare
Google Vids, not to mention, the Instagram and TikTok native app editing tools, use almost the same logic for how to put together a video. The timeline, scrubber (line on the timeline showing you what you’re looking at currently in the frame), scene management, and animation controls work almost the exact same way with only subtle differences. If you’re already familiar with putting together videos in Canva, you will be able to quickly pick up editing in these other tools with only mild initial frustration and vice versa.
So if you’re already comfortable in Canva, stay there. The same goes for Google Vids, Instagram or TikTok reel creation tools or any other video editing tool. The skills transfer readily enough and if you’re successfully already making reels, there is no need to change platform unless you find that the platform you’re on doesn’t have a feature you’re wanting such as recording.
One of the main limitations to video editing in Canva as compared to these other platforms is the lack of video creation features such as the ability to record yourself or screencast within the app. Google Vids can do both of these. Add your script, then record your camera, screen, or both. A scrolling teleprompter plays during recording but doesn’t appear in the final output. You can record yourself as well in TikTok and Instagram, which can streamline the reel creation process.
Pro tip for teleprompter use: position your script right next to your webcam and make the text column narrow so that your eyes aren’t travelling all over the screen as you record your video.
Final Touches and the Algorithm
Export your finished video as an MP4, regardless of where you edited it. The file is identical whether it came from Canva, Google Vids, or your phone.
Upload to Instagram or TikTok and add music, stickers, and trending features natively. Both platforms preference content that uses their own features. Music added natively avoids copyright issues as well. Don’t bring in your own audio from an external source unless you are sure the license will cover its use on whatever platform you plan to post the video.
The first three seconds of a reel determine whether someone will keep watching. Cut any opening pauses, smiles, or build-up. Start with the thing you want to say. That’s your hook, and it’s the most important edit you’ll make.
Do make sure your reels include subtitles because a large share of viewers watch with the sound off. Instagram and TikTok generate their own transcripts to understand the content so you don’t have to worry about the algorithm when choosing where you add your subtitles (in an external video editing tool or natively on the Instagram or TikTok apps).
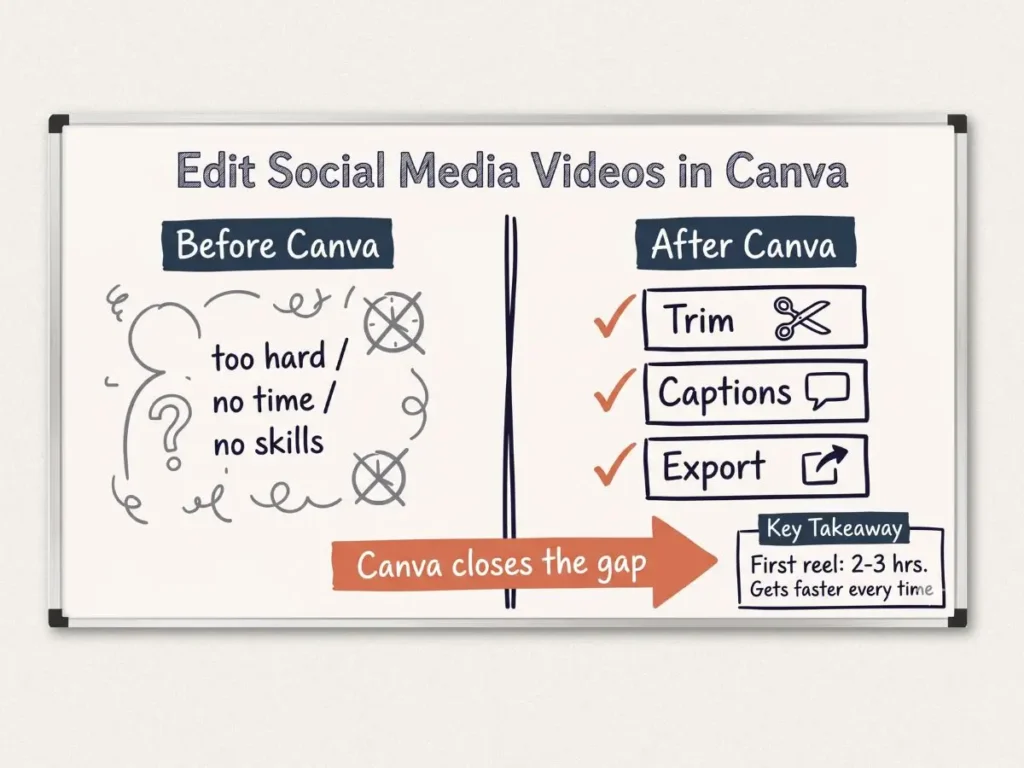
The first video takes two to three hours. With each one, the process gets faster. Use a consistent format and starting template each time. Use Claude, ChatGPT, or Gemini to draft your script. If you give the AI a brand DNA document — a short file describing your business, your guests, and your tone — the output sounds like you, not like generic AI copy.
Things to Try This Week
- Start a new project in Canva using a blank Mobile video template and import one of your existing clips.
- Practise trimming non-destructively by dragging the white lines at either end of a clip on the timeline, then extending it back again.
- Try the Highlights tool on a longer video to see which sections Canva selects automatically.
- Generate captions on your clip, fix any errors, then export as MP4.
- Upload natively to Instagram or TikTok and add music and any trending stickers there, rather than baking them in during editing.
- Write a brand DNA prompt — one paragraph describing your business, your guests, and your tone — and paste it into Claude, ChatGPT, or Gemini before writing your next video script.
Want to get your tourism business more visible online?
Showing up consistently on social media builds trust faster than almost anything else. If you’re not sure where to focus your digital effort or which tools are worth your time, we can help. Tourism Tribe offers three ways to help:
- GEO Assessment: find out how visible your business is to AI tools right now
- Digital Direction Plan: a personalised roadmap for your digital and AI strategy
- AI Enablement Plans: ongoing access to Tourism Tech Sessions, tools, and hands-on support
Do I need to pay for Canva to edit social media videos?
You don’t need to pay for Canva to do basic video editing. Most tools — including trimming, layering, subtitles, and animation — are on the free plan. The paid features (shown with a crown icon) include the Highlights tool, which automatically selects the best sections from a longer clip, and the background remover for talking head videos. You can edit a complete, polished video without a paid plan.
What is non-destructive editing in Canva?
Non-destructive editing means that when you trim a video clip in Canva, you are not permanently cutting the footage. You drag the white line at the start or end of the clip on the timeline to hide the section you don’t want, but the original source file stays intact. You can go back and extend the clip again at any time without losing anything.
Should I add subtitles to my tourism business videos?
Yes, but not because it helps the algorithm. Instagram and TikTok generate their own transcripts from your audio, so adding subtitles before uploading doesn’t change how the platform ranks your video. The real reason to add them is that a large share of viewers watch without sound. Canva’s caption tool is fast and reasonably accurate, but check the transcript carefully if you have a strong Australian accent and fix any errors before exporting.
Why should I add music and stickers on Instagram or TikTok rather than in Canva?
Both platforms give algorithm preference to content that uses their own native features — music from their libraries, stickers, and trending effects. A video that arrives with everything already embedded from an external editor is not treated the same way. Edit the core video in Canva, export it as an MP4, then do the final touches natively on the platform. It also means you avoid copyright issues by using the platform’s licensed music library.
Is Google Vids worth learning if I already use Canva?
If you are already comfortable in Canva, you don’t need to switch. The interfaces are similar enough that skills transfer directly. The one place Google Vids has a clear advantage is the teleprompter recording feature, which lets you record to camera while reading a scrolling script that doesn’t appear in the final video. If that appeals to you, Google Vids is worth trying. Otherwise, stick with what you know.
How long does it take to make a social media video?
The first few videos take the longest. Expect two to three hours for your first attempt. With practice, the same type of video gets faster each time. The biggest time-saver is consistency. Use the same format, the same starting template, and the same workflow each time so you are not making decisions from scratch. Using an AI tool to draft your script also cuts preparation time significantly — especially if you give it a brand DNA document describing your business and tone first.
Your free AI marketing coach, right in your pocket
The free Pocket Rocket app gives you a personal AI marketing coach, website audit, weekly action plans and 5-minute tips. Built for tourism operators.